Nail shaping is a crucial aspect of nail care, enhancing beauty and hygiene. It involves trimming, filing, and buffing to achieve desired shapes, serving as a foundation for all nail aesthetics and boosting confidence.
1.1 Importance of Nail Shaping for Beauty and Hygiene
Nail shaping is essential for both aesthetic appeal and maintaining proper hygiene. Well-shaped nails create a polished appearance, complementing personal style and serving as a canvas for nail art. Properly trimmed and filed nails prevent dirt accumulation, reducing the risk of infections. Regular shaping also strengthens nails by removing weak edges, preventing breaks. It enhances overall hand hygiene, promoting confidence and a professional look. Nail shaping is a simple yet impactful step in personal grooming, ensuring nails remain healthy and visually appealing.
1.2 Brief Overview of Popular Nail Shapes
Popular nail shapes include square, oval, almond, round, stiletto, squoval, and coffin. Square nails are ideal for short fingers, while oval and almond shapes elongate the nail bed. Round nails suit weak or brittle nails, and stiletto nails offer a bold, dramatic look. Squoval combines square and oval features, and coffin nails are perfect for trendy, edgy styles. Each shape complements different hand types and lifestyles, offering versatility for personal expression. Understanding these shapes helps in choosing the most flattering option for individual preferences and nail health.
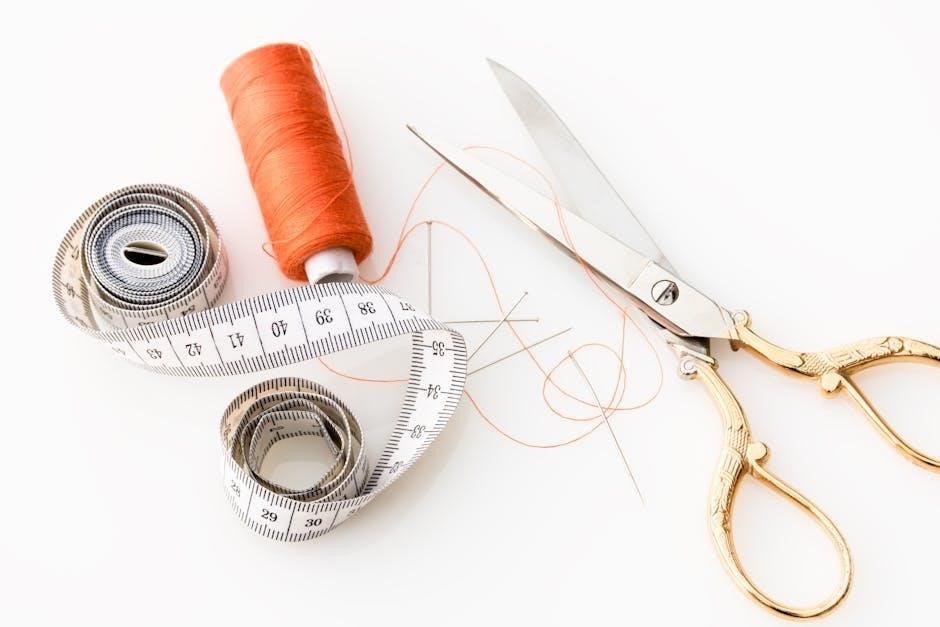
Tools and Materials Needed for Nail Shaping
Essential tools include nail clippers, files, and buffers. High-quality nail files are crucial for achieving smooth edges and precise shapes, ensuring professional-looking results at home.
2.1 Essential Tools: Nail Clippers, Files, and Buffers
Nail clippers are used to trim nails to the desired length, while files shape and smooth the edges. Buffers refine the surface, ensuring a polished finish. High-quality tools, like glass nail files, are recommended as they prevent tearing and provide precise results. Clippers should be sharp to avoid splitting nails, and files with varying grits (coarse to fine) help achieve the perfect shape. Using these tools properly ensures professional-looking results and maintains nail health. Trimming before filing saves time and helps achieve the desired shape efficiently.
2;2 Importance of Using High-Quality Nail Files
High-quality nail files are essential for achieving precise shapes and maintaining nail health. Glass files are preferred over disposable cardboard ones, as they provide a smoother finish and prevent tearing. Using a file with varying grits (coarse to fine) ensures a professional result. Sharp clippers and proper filing techniques are crucial for avoiding nail damage. Investing in durable tools enhances the nail shaping process, leading to cleaner, more polished results that last longer and promote healthy nail growth. Quality tools are key to achieving salon-quality finishes at home.

Popular Nail Shapes and Their Characteristics
Popular nail shapes include square, oval, almond, round, stiletto, and squoval. Each shape complements different finger types and personal styles, offering versatility for various aesthetic preferences and lifestyles.
3.1 Square Nails: Perfect for Short to Medium-Length Fingers
Square nails are a classic choice, ideal for short to medium-length fingers, as they create a balanced, neat appearance. To achieve this shape, trim nails to the same length and file straight across the tip, ensuring corners are slightly rounded. This style complements those with shorter fingers, making them appear longer. It’s versatile and suits both casual and formal looks, providing a clean, polished finish that enhances overall nail aesthetics and personal style effortlessly.
3.2 Oval Nails: Ideal for Elongating the Finger
Oval nails are a timeless and versatile choice, perfect for elongating the appearance of fingers. To achieve this shape, nails are filed into a smooth, curved tip, following the natural contour of the nail bed. This style is ideal for medium to long-length nails and complements most finger types. Oval nails create a sleek, elegant look and are a popular choice for those seeking a balanced, sophisticated appearance that enhances finger length while maintaining a natural and polished aesthetic.
3.3 Almond Nails: A Timeless and Versatile Choice
Almond nails are a popular and sophisticated choice, characterized by their pointed tips and curved edges; This shape is ideal for medium to long nails, creating a sleek, elegant appearance. The almond shape elongates the fingers, making them appear more slender. It is versatile, suitable for various occasions, and complements numerous personal styles. Many find almond nails timeless due to their classic appeal, making them a favorite for those seeking a polished, refined look that enhances natural beauty while offering a touch of sophistication.
3.4 Round Nails: Great for Weak or Brittle Nails
Round nails are an excellent choice for those with weak or brittle nails, as they minimize stress and reduce the risk of breaking. The curved shape distributes pressure evenly, making them more durable. This style is easy to maintain and requires minimal filing, preserving nail strength. Round nails are versatile, working well for short or medium-length fingers, and suit casual or professional settings. They are a practical option for individuals seeking a low-maintenance yet elegant look that enhances natural beauty without compromising nail health.
3.5 Stiletto Nails: Bold and Dramatic
Stiletto nails are a striking and fashionable choice, characterized by their long, narrow shape that tapers to a sharp point. This bold style makes a dramatic statement, ideal for those who want to stand out. While they require more maintenance due to their length, stiletto nails are perfect for special occasions or for adding edge to a look. However, they may not be suitable for everyday wear due to their fragility and potential damage to weak nails. Proper care and filing are essential to maintain their sharp, polished appearance.
3.6 Squoval Nails: A Hybrid of Square and Oval Shapes
Squoval nails are a versatile and popular choice, combining the best of square and oval shapes. Characterized by a flat tip with slightly curved edges, they offer a balanced look that complements most finger lengths and nail beds. This hybrid shape is ideal for those who want a modern, elegant appearance without the extremes of square or stiletto nails. Squoval nails are achieved by filing straight across the nail and slightly rounding the edges, making them a practical and stylish option for both short and long nails.
Step-by-Step Guide to Shaping Your Nails
Trim nails to desired length, file for shape, and buff for smoothness. Use clippers for straight cuts and files for precise shaping, ensuring even edges always.
4.1 Preparing Your Nails: Trimming and Cleaning
Start by trimming your nails to the desired length using clippers, ensuring straight cuts for evenness. Cleanse your hands and nails with a sanitizer to remove oils and dirt. Gently push back cuticles to expose the nail plate, then rinse hands. Use a lint-free wipe to remove residue, ensuring a clean surface for filing. Proper preparation sets the foundation for precise shaping and prevents uneven results. Always sanitize tools to maintain hygiene and achieve professional-quality nail care at home.
4.2 Filing Techniques: How to Achieve the Perfect Shape
Begin by selecting the right nail file for your nail type, preferably a glass or high-quality file. Hold the file perpendicular to the nail edge and gently glide it in one direction from the cuticle to the tip. Avoid sawing back and forth to prevent weakening the nail. For square or squoval shapes, file straight across, while oval or almond shapes require a curved motion. Check the shape from all angles to ensure symmetry. Light, steady strokes will help refine the edges without causing breakage. Regular filing maintains the desired form and prevents unevenness.
4.3 Buffing: Smoothing Out the Edges
Buffing is the final step in nail shaping, ensuring smooth edges and a polished finish. Use a multi-sided buffer, starting with a coarse grit to gently remove ridges or imperfections. Progress to finer grits for a glossy finish. Buff in one direction only, from the cuticle to the tip, using light pressure to avoid damaging the nail. This technique not only smooths the surface but also enhances the natural shine of your nails, preparing them for polish or leaving them looking neat and well-groomed.

Maintaining Your Nail Shape
Regular trimming and filing are essential to preserve your nail shape. Monitor nail health, touch up edges, and avoid harsh chemicals to maintain durability and appearance consistently.
5.1 Regular Trimming and Filing
Regular trimming and filing are vital for maintaining your nail shape. Trim nails every 1-2 weeks to prevent overgrowth and breakage. Use clippers for straight cuts and files for precision shaping. File in one direction to avoid weakening the nail. Maintain consistency by checking and adjusting the shape weekly. This routine ensures nails stay neat, healthy, and polished. Consistent upkeep prevents uneven edges and keeps your desired shape intact over time.
5.2 Touching Up: Keeping Your Nails Looking Their Best
Touching up your nails regularly ensures they remain well-groomed and polished. Light filing or buffing can correct minor imperfections, while trimming stray edges maintains shape. Apply a top coat to refresh polish and prevent chipping. Check nails daily for chips or ridges and address them promptly. Regular touch-ups prevent major repairs and keep nails looking professional. This consistent attention extends the life of your manicure and maintains a flawless appearance, ensuring your nails stay healthy and visually appealing.
Customizing Your Nail Shape
Customizing your nail shape allows for personalization, enhancing style and confidence. Explore nail art, bold designs, or subtle patterns to express individuality, making your nails uniquely yours.
6.1 Adding Nail Art and Designs
Nail art and designs add a personal touch to your nail shape, offering endless creativity. From minimalist patterns to bold motifs, you can enhance your look with polka dots, stripes, or intricate details. Use nail guides, stickers, or freehand techniques for precision. Match your design to your nail shape—almond nails suit geometric patterns, while square nails showcase bold art. Experiment with colors and themes to express your style. Finishing with a top coat ensures durability, keeping your masterpiece intact for longer. Nail art transforms your nails into a unique fashion statement.
6.2 Choosing the Right Polish for Your Nail Shape
Choosing the right polish for your nail shape enhances its appearance and personalizes your look. Select finishes like glossy or matte based on your style. For square nails, bold, vibrant colors create a striking contrast, while soft hues complement oval or almond shapes. Metallic polishes work well for stiletto nails, adding drama. Consider the color’s ability to elongate or shorten the finger visually. Match your polish to your nail shape and personal style for a polished, professional finish that elevates your overall aesthetic.

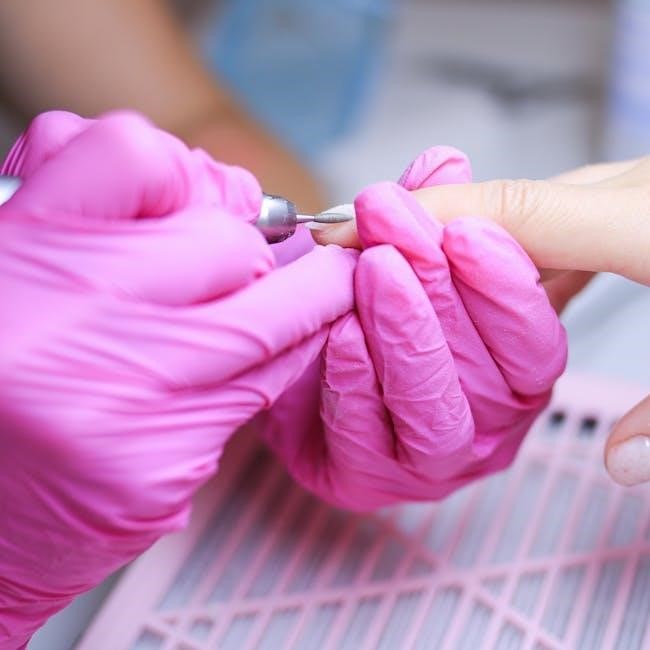
Troubleshooting Common Issues
Common issues like uneven nails or ridges can be fixed by using the right tools. Prevent breaks by being gentle and using nail strengtheners regularly.
7.1 Fixing Uneven or Ridges
To address uneven nails or ridges, start by gently filing in one direction using a good-quality nail file. This ensures a smooth surface. For ridges, buffing with a nail buffer or buffer block can help even out the texture. Regular maintenance and avoiding harsh chemicals prevent such issues. Using a nail strengthener can also help fortify nails and reduce ridges over time. Consistent care ensures nails remain healthy and visually appealing.
7.2 Repairing Broken or Chipped Nails
To repair a broken or chipped nail, start by applying a small amount of nail glue to the affected area. Gently press the nail back into place and let it dry completely. Use a nail buffer to smooth out any rough edges. For a more durable fix, apply a nail tip or wrap, then shape and file to blend seamlessly. Finish with a strengthening base coat and top coat to reinforce the nail. Regular maintenance and avoiding harsh chemicals help prevent future breaks.